How I Got Started

I started Butterfly gardening many years ago. My yard has been a progression over the years, and has made many transformations. Twenty years ago I experienced Hurricane Andrew. My yard and house were destroyed. We decided not to replace the pool screening and open up the backyard and put in some landscaping. That was the official beginning of my love for gardening in South Florida. I added a beautiful water garden years ago, and have been adding host and larvae plants for pollinators, mostly for the butterfly, for as many years as I can remember. I had my yard certified as a Natural Habitat, through the National Wildlife Foundation. To have a natural habitat you need to provide and meet certain requirements: 1. Provide a food source, 2. Provide a water source, 3. Cover, 4. A place to raise young. I try not to use any pesticides in my yard. I vermicompost and recycle as many of my food scraps as possible. If I had more land I would have a huge compost bin to recycle all my yard cuttings. Basically, I try to lessen my carbon footprint on this earth. In my own little world or backyard I try to provide an ecosystem in my water garden, provide birdbaths, birdfeeders, hummingbird nectar sources, feeders, puddling areas, host plants and nectar plants for butterflies and other pollinators. I am hoping to raise everyone’s awareness of the importance of saving our Butterflies, Blooms & Bees. Without them our world and food source will be in trouble. I hope you all enjoy my journey. I am not a Master Gardener, or Master Beekeeper, an Entomologist, or Journalists. I am simply a Backyard Gardener who is trying to lessen her Carbon Footprint of this Earth.

I hope you enjoy my blogs.

Saturday, November 3, 2012

Preparing a Square Foot Garden Part 2

I am still in the preparation mode for my square foot garden. Last weekend I decided that I needed one more 4x4 raised bed to house my tomato plants. I think I got a little overzealous with the heirloom tomatoes. I have 11 different varieties: Floridade, Beefsteak, Riesentraube, which I found out, is Margaret Roach’s, “A Way to Garden” favorite tomato. I got this variety for free from the Baker Creek Heirloom Seed Company and had no idea what type of tomato it was. Riesentraube actually means giant grape. I also have Black Plum, Hawaiian Currant, Yellow Pear, Super Snow White, God Love, Coyote, Isis Candy Cherry, and Grandpa’s Minnesota, which are all heirloom cherry tomatoes. That is a lot of tomatoes. I have watched a lot of videos about planting tomatoes and I was concerned that planting a tomato plant in 1 square foot would really be crowding them. So I have decided to give them more space and therefore built an extra box.

I have recently started exercising again and have been watching my diet very closely. I think they call that a life-style modification, as opposed to diet. Well Cherry tomatoes have become my new best friend. They are so sweet that they actually satisfy my sweet tooth. Crazy right!

I put together the carrot box that will sit on top of my grid. This will make the depth of my soil deeper for the carrots. I also put together my grids that will sit on top of each 4x4 garden. My husband Dave was a huge help as he helped me with the boxes, mixing the dirt and putting together the grids. I couldn’t have done this project without him!


I have been mixing the soil (Mel’s Mix) which isn’t difficult but time consuming. The soil is probably the most important aspect to any garden. It really will make or break how well your plants thrive. I also mulched around the boxes and planted some Sunflower seeds to add some color to the garden, distract from the ugly wall of my house, and hopefully attract some pollinators to my vegetable garden. I wish I was an artist because I would paint some beautiful Sunflowers on the wall of the house.


Here is a video I think really explains Square Foot Gardening (SFG). It is very concise, but says it all!


I found an awesome website while I was watching videos on You Tube about Square Foot Gardening. It can be found at www.growveg.com. It is a great program to actually plan your garden; they even have an “app“for your iphone. There are tutorial videos so you can figure out how to work the website. It really is very user friendly. Here is my plan below. The nice thing about the website is that you are able to go back into your plan and make adjustments, which I have done several times. You are able to plot where you want each plant; you can even keep notes on each plant as far as variety, and specific growing instructions.

http://www.growveg.com/garden-plan.aspx?p=316616

So how did I decide where to plant each plant? Well first of all I considered spacing, which is what Square Foot Gardening is all about. I wanted to give the taller plants and vineing plants more room. It says to plant tall plants on the North side of your garden as to not shade your smaller plants. I actually tried to keep most of my taller plants in the back of the garden. I plan to build trellises to support these taller plants on the back of each box. Another important consideration in plant placement is Companion Planting. Companion Planting is planting plants together that may compliment or help each other. For example have you ever heard of the “Three Sisters?” The Three Sisters is a Native American tradition. After all the American Indians were our first gardeners. The Native Americans believed that corn, beans, and squash are the three inseparable sisters who can thrive only when raised together. Corn provides a natural pole for the beans vines to climb, while the bean vines help shore up the corn stalks and leave behind nitrogen for the soil. Spreading squash shades the bed from weeds and keeps the soil moist, and all three plants create rich compost after the harvest. Corn, beans, and squash not only complement one another in the soil, they also complement one another nutritionally. Corn provides carbohydrates; beans are rich in protein, and squash offer vitamins from the fruit and nutrient-rich oil from the seeds. Native Americans shared their Three Sisters planting system with early European settlers and taught them to recognize the signs that it is time to plant. Speaking of the Indians I received several Seminole squash seeds from Richard Campbell the curator of Fairchild Botanical Gardens. These seeds are actually from the Seminole Indians. The Indians used to girdle the Oak trees which would kill them and allow the squash to utilize the tree as a trellis and allow the squash to grow up the oak tree. There is an excellent article in the magazine “Edible Miami” written by Richard Campbell about the history of the Seminole Squash. I was very pleased to receive these seeds, and planted them next to my fence line so they could use the fence as a trellis.

So in planning my plant placement I will be planting my corn next to my squash. I didn’t choose to grow beans but I am sure that the corn and squash will be good together. I tried to plant aromatic plants in the same bed as the tomatoes to deter pests. There is a great book by Louise Riotte “Carrots Love Tomatoes: Secrets of Companion Planting for Successful Gardening.” Information about Companion Planting is also on the garden planner www.growveg.com.

I finally have all the dirt in all four boxes and the grids in place. I am waiting for my drip irrigation system to arrive. This will make watering so much easier and hopefully make my plants thrive and keep them free from pests. I look forward to planting in the next week or so, as soon as I have the drip irrigation system in place.

Monday, October 29, 2012

Harvesting Honey!


It is amazing that so much can change in two weeks within the hives. Last time I was in the hives they were looking great! On Sunday when I went into the hives they were all Queen Right, but the populations were definitely smaller than they were two weeks ago. I think the bees know that winter is approaching, or at least what winter we have here in Miami. We are going to experience out first cool front of the season this week! Hallelujah!! A few of the hives still had some small hive beetles, but they are mostly corralled towards the back of the hives. The bees seem to be doing a good job keeping them in check. My main concern happened when I went into hive #3. There were hundreds of ants crawling up the cinder blocks, up the hive, and into the entrance. The population looked dismal and I thought for sure the hive had absconded from the ant infestation. The queen was present and the population actually improved as we got closer to the brood nest. The queen was just a little further back in the hive than normal. I found myself having to condense many of the hives, since the populations seemed much smaller than two week ago. I took several bars of capped honey to harvest. The bars in hive #3 that had ants I took because first of all there was no brood present, and also the queen had moved back into the hive to lay. It is amazing that they instinctively know that the ants are not a welcomed visitor. I need to watch this hive very closely because it is much weaker than it was two weeks ago. I did give it two bars of capped brood from hive #5, which is my brood box. Hopefully that will boost the population within hive #3, and give it enough resources to recover. Consolidating the hives and taking comb that isn’t necessary, will allow the bees not to have to protect empty comb against unwanted pests like ants, and small hive beetles. If you give your bees too much area to protect it sets them up for failure. Most of the hives are about 12-18 bars right now. With the cooler weather about to approach consolidation prepares them for winter.

As always, whenever I consolidate my hives I end up being able to harvest several bars of beautiful honey. Today I actually harvested about 12 pounds of honey. I put most of it in quart jars and have plans to make my first ever Cyser. My Joe’s Ancient Orange Mead is still fermenting on the kitchen counter; I look forward to tasting it during the holidays. No matter how often I harvest my honey it still is a precious gift given to me from my bees. Every drop is liquid gold!!

Thursday, October 25, 2012

Preparing a Square Foot Garden

I have been preparing to plant my first vegetable garden for several weeks now. In preparation I have been reading many books and articles about vegetable gardening in Florida. Florida is a different animal than the rest of the country. Growing up in the north I am use to vegetable gardening ending as fall and the first frost is occurring, but here in Miami our growing season is just beginning. So what is involved in preparing to set up my vegetable garden?

First of all it is important to pick a site that gets at least 6 hours of sun and is close to a water source. The west side of my house gets sun from mid morning until almost sunset. I am slightly concerned that it may get too much sun, but many of the fruiting vegetables such as tomatoes, need a lot of sun to produce fruit. I have several water faucets on that side of the house and I also have access to my well water. I have considered adding a water barrel to collect rain water, but the rainy season is almost over. This is something to think about for next year. It is the perfect site as it is right near one of the downspouts coming off the house. I could set up a water barrel to collect water right there. It is right next to where I will have the garden. Good drainage is also important. You do not want water pouring off the roof line and flooding your plants, nor do you want an area where water doesn’t drain well. You also want to make sure that you locate your garden in a convenient place. I really can’t see the garden on the west side of the house, but it is the sunniest area in the yard. It also is not in an area where my big Boxer Bandit can run through the plants. There is no traffic in this area and other than a few birds or raccoons. I think the garden will be in a great place in my yard.

Secondly it is important to prepare your beds or containers. At first I thought I would dig down and work my soil by adding compost, and organic material, but as soon as I started to dig I realize this would be a big undertaking. I did not think I was strong enough and it would take a lot of work to improve my soil. I considered getting my soil tested. Remember that most of the neighborhoods in my area of South Florida were built on Coral Rock. This is very difficult to improve. As I started researching I decided that a better idea for a South Florida garden would be to consider a raised bed garden. I discovered a method called Square Foot Gardening. I will go into greater detail in a minute. I had never heard of this method before and I think it is the perfect plan for my garden.

Now the plan. Before planting, draw a garden plan that includes the name, location and planting date of the vegetables you want to grow. The University of Florida has an excellent planting guide for Floridians to follow. http://edis.ifas.ufl.edu/vh021 Make a list of supplies and order seeds. I ordered mostly heirloom seeds months ago from Baker Creek Heirloom Seed Company. I was very concerned about not planting any GMO seeds in my garden and also did not want to choose hybrid seeds. Heirloom seeds are passed down for many generations and are open pollinated. As a sustainable organic gardener this was an important consideration in picking my seeds.

The most important factor to consider in planning a vegetable garden is your soil. I will go into further detail about the soil when I explain the Square Foot Garden Method. Most Florida soils benefit from the addition of organic matter, such as animal manure, rotted leaves, compost, and commercial soil mixes. Adding your own compost from your own compost pile is also an excellent source of organic matter.

So what is the Square Foot Garden method and who developed it? It was developed by Mel Bartholomew. His gardening book is the best selling gardening book ever sold, with over 2 million copies sold. He was a civil engineer by profession and a frustrated gardener by weekend. When he retired he decided to attend a composting class given by his local nursery. The instructor ended up not showing up and he led the discussion and the class decided to meet again. He was convinced that single row gardening was a waste of energy and output. Single row gardening was the norm because “that’s the way we’ve always done it.” Mel Bartholomew condensed the unmanageable single-row space to 4x4 feet, amended the soil, and he developed a gardening system that yields 100% of the harvest in 20% of the space. His method gained popularity and strength, and ultimately converted more than one million gardeners worldwide. “Square Foot Gardening,” was the highest rated PBS gardening show to date. Launched in 1981, it ran weekly for five years.

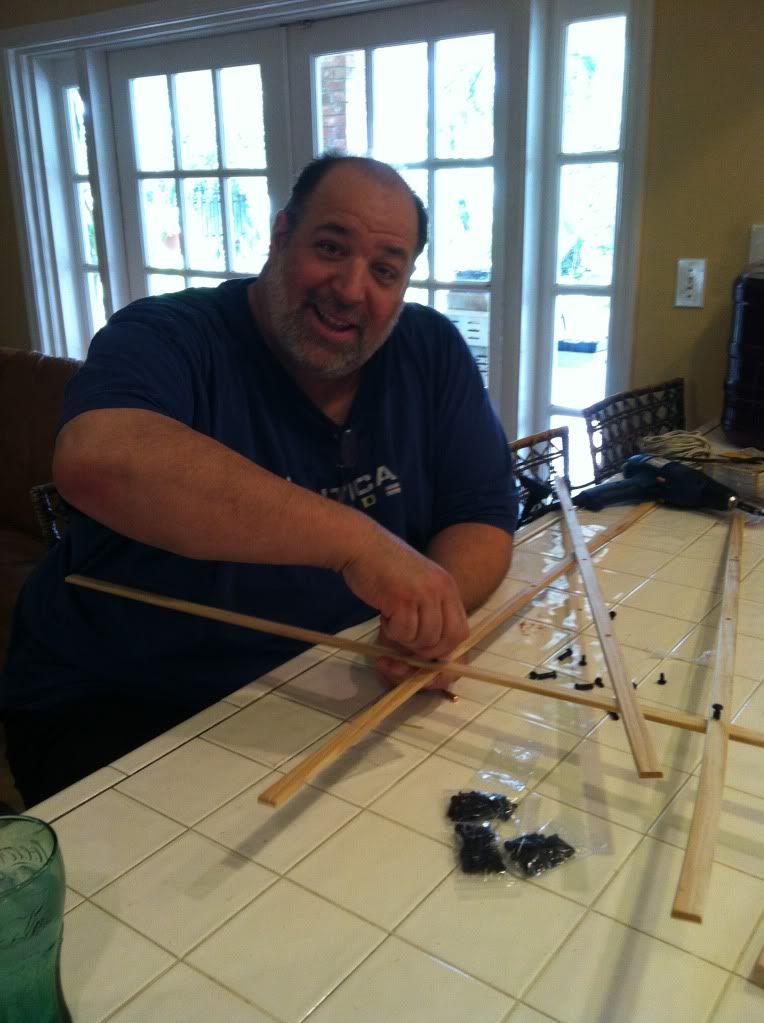
After discovering his method I quickly bought his book. I thought this was the perfect method for my first vegetable garden. He recommends building 4x4 boxes only 6 inches high. You should be able to access your box from all sides. That is why he recommends no larger than a 4x4 space. I built three 4x4 boxes out of pine. I followed his instructions and watched several YouTube videos on how to build raised bed garden boxes. They were pretty easy to build. Here are some pictures of me building the boxes. I think I look like I know what I am doing right? I did not use treated wood as I did not want any chemicals from the wood to seep out into the soil. I chose to use 10 inches high wood because I wanted to plant carrots, and other root vegetables. One of the most important concepts to Square Foot Gardening is the grid that is placed on top of the boxes. Without this grid it would not be square foot gardening. I purchased mine through Mel’s website. It is made from wood, and the 4x4 area is mapped out into square foot sections. So, in a 4x4 box you have 16 square feet in which to garden. Depending on the size of the plant you can plant 1, 2, 4, 6, 9, 16 plants per square foot. For example, 1 tomato, 2 cucumber, 4 swiss chard, 9 spinach, 16 carrots etc. in a square foot. To conserve space he recommends gardening up.


Because you are using a raised bed he recommends the perfect soil. So no matter what your local soil conditions are in your area, you will start with the perfect soil named Mel’s Mix. It consists of 1/3 compost, 1/3 peat moss, and 1/3 coarse vermiculite. I went down to Homestead, Florida to Diamond R Fertilizer and bought enough peat moss, vermiculite, and some of the compost soil. I needed approximately 14 cubic square feet per each 4x4 box. He also recommends using compost from different sources. So I bought several bags from 3 different sources, Diamond R, Home Depot and my local nursery.


There is so much that I could tell you about his method and I highly recommend his book if you are planning a vegetable garden with limited space. His method conserves resources and like I said earlier yields 100% of the harvest in 20% of the space.

I am at the point that I am ready to start planning where each plant will go. I am looking into companion planting to help me decide what plants to plant next to each other. I believe I have all my equipment that I need to start planting. I have built my boxes, I have my soil to mix together, and my seedlings are started. In fact I transplanted my tomatoes, and peppers into larger pots, so they can grow a little bigger before I plant them permanently in my square foot garden. The area where the boxes are to be located is ready. I am just waiting for the weather to get just a little cooler. Supposedly we are going to experience our first cold front next week, after we experience a late season tropical storm/ hurricane Sandy.

Sunday, October 21, 2012

Happy One Year Anniversary!!!!


Can you believe that it has been one year since I started bee keeping? I know it is really hard to beelieve! For those of you that follow my blog you know it hasn’t exactly been a boring year. It has been exciting, and very eventful! Looking back I can definitely say I have learned a lot, and I certainly haven’t been bored. When I first started beekeeping I really had very little idea what I was doing. I just wanted to help the pollinators, reap the benefits of getting some honey, and thought it would be a really cool hobby. Little did I know that I would risk life and limb, so to speak, during this year to protect these very special pollinators?

Looking back over the year it has been pretty amazing and very rewarding. I started with 2 TBH and now have 5 hives. The first time I saw Sam Comfort at the Palm Beach County Beekeepers Association meeting he asked me how my bees were doing. I honestly couldn’t answer as I really didn’t know enough. Now I can answer quite honestly, “they are doing great!”

To recap the year in beekeeping my hives grew tremendously in the spring. I split the hives from 2 hives to 4 hives and then battled them over the next few months until they raised a queen. It felt like this would never happen, and of course the weather didn’t help at all. As you know we are almost ready to break a record for the most rainfall since 1959. After several months all my hives were queen right. I got to visit Albuquerque NM, and take a beekeeping class from Les Crowder. I learned a lot from that visit and thoroughly loved that part of the country. I rendered wax from my hives, have made honey Mead, and of course harvested many wonderful jars of honey.

For those of you that follow my blog you know that I experienced an anaphylactic reaction after sustaining several stings in June. That was really scary and I hope it never happens again. I am still visiting the allergist for immunotherapy, which will continue for several years. From my blog pictures I have had several run ins with the bees, and sometimes think I am practicing “Combat Gardening”, but I have survived. My bees have stung my yard and pool guys; thank God no law suits yet. Right now the hives are “bee having” and the Brazilian pepper is in bloom. That means the honey flow is on.

I have learned so much during this first year. Here’s to an exciting 2nd year!! Happy Anniversary to me and my hives! Most people would have given up, but I am determined!

Sunday, October 14, 2012

Building a Compost Bin

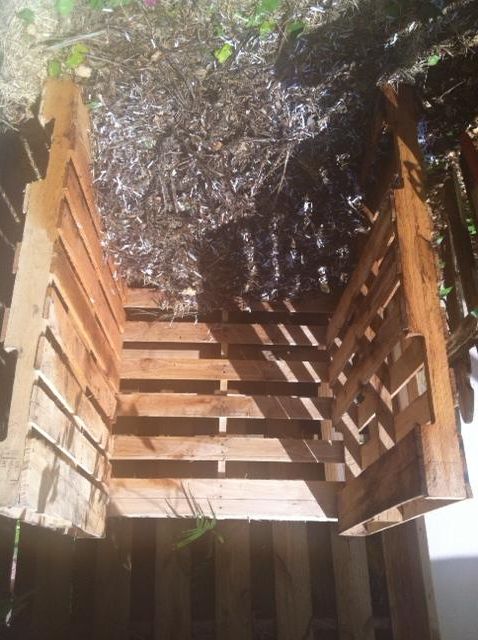
I finally got 3 used wooden pallets to make a compost bin for my yard. For many years I have been trying to vermicompost, but it is very difficult with the heat in Miami. I have even gone so far as to freeze small water bottles and put them in the worm bin to keep it cool. I actually had my last compost bin in the tub in my bathroom to keep the worms cool enough so they would live. It worked well but I had some kind of nematodes crawling in my tub and my mom was coming to visit and I thought she would freak out if she knew I had worms in my tub, so I moved them outside. Many years ago a friend of mine told me to just dig a hole in the ground and add compost material and worms and you have a worm bin. I am finally incorporating that idea into my new compost bin.

First of all what is vermicomposting?? The simple answer is composting with worms. A more technical definition is: Vermicompost is the product or process of composting using various worms, usually red wigglers, white worms, and other earthworms to create a heterogeneous mixture of decomposing vegetable or food waste, bedding materials, and vermicast. Vermicast, also called worm castings, worm humus or worm manure, is the end-product of the breakdown of organic matter by an earthworm. These castings have been shown to contain reduced levels of contaminants and a higher saturation of nutrients than do organic materials before vermicomposting. Containing water-soluble nutrients, vermicompost is an excellent, nutrient-rich organic fertilizer and soil conditioner. This process of producing vermicompost is called vermicomposting.

I started vermicomposting many years ago; like I said I have not really been that successful mostly because of the heat in Miami. I started with a simple container called “Can O Worms”. It is a simple system where you stack circular bins on top of each other. First you add your food scraps from the kitchen into the first layer, until the worms break them down into compost. Then you add the next layer, the worms are suppose to crawl up through the holes, they start processing the next layer, so on and so forth. The issue with “Can O Worms” is that the circular bins do not have enough surface area for the worms to bury. The container is too narrow and the organic matter heats up too quickly and the worms cannot stay cool enough. The earth worms that you use to vermicompost are usually red wigglers Eisenia foetid. Redworms prefer temperatures between 55 and 77 degrees Fahrenheit and are suited to living in a worm bin, but not here in South Florida. The temperature of the bedding should not be allowed to get below freezing or above 84 degrees. There are so many days in Miami that are above 84 degrees, which is exactly the problem.


Why use worms? Well, for one, because they're cool. Not only are they slimy and neat-looking, these amazing little organisms can eat up to half their body weight in food every day. Using worms instead of a compost pile ensures faster composting and a rich, dark fertilizer. Besides -- what's more fun than getting to say, "Worms eat my garbage?" In fact there is an excellent book titled “Worms eat my Garbage” by Mary Appelhof. This is an excellent resource to learn all about vermicomposting. Red wigglers are surface feeders so the container cannot be too deep, although in Miami it needs to be deep enough that the worms have enough area to ensure that the organic matter stays cool enough.

A year or so ago my husband and I built a “Flow Through” compost bin out of a garbage can. It worked well for awhile but again because it was made from recycled black plastic it retains the heat and the worms would get too hot and eventually they died. Here are a few pictures from us building that compost bin. This one actually worked better than the Can o Worms. We put air vents in the lid to keep the unit cooler. We lined the bottom with newspaper and cardboard that eventually would decompose, and the worm casting and compost would flow through the PVC piping into the bottom of the compost bin to use in my garden. We even screened the bottom so no critters could get into the unit. I tried to place the unit where it only got a little morning sun but ambient temperature was just too hot and eventually my worms would die.


I haven’t done any composting in several months and it feels good to be collecting my food scraps and yard debris to add to my compost pile. I built a simple compost bin out of 3 used wooden pallets. It was very easy to put together using deck screws to hold the unit in place. I didn’t add a door and am leaving the unit open and hoping that I do not get too many critters helping themselves to the rich compost material. My philosophy in my yard is to be as responsible as possible by incorporating as much sustainable gardening as possible. I am trying to lessen my carbon footprint on this earth. Composting is just one more way to do this. Vermicomposting like I said is just composting with worms. I am not sure if my worms will live, but I am hoping that this new bin might be the answer to my vermicomposting troubles. It is kind of like digging a hole in the ground and adding worms. It just contains them a little better.


What do I add to my compost bin?? All organic matter is made up of Carbon and Nitrogen. The balance of these two elements in an organism is called the carbon-to-nitrogen ratio (C: N ratio). For best performance, the compost pile, require the correct proportion of carbon for energy and nitrogen for protein production. Scientists have determined that the fastest way to produce fertile, sweet smelling compost is to maintain the C: N ratio somewhere around 25 to 30 parts carbon to 1 part nitrogen. You can think about Carbon as Brown material like wood chips, dried leaves, newspaper and paper towels, and plant and grass clippings. Nitrogen or Green material examples are food scraps from your kitchen, tea bags, coffee grounds, nuts, and seeds. You should avoid placing meat, fish, dairy, or oils in the compost bin. Your compost bin should be moist, but not wet. The more you aerate your compost bin the quicker the organic material will break down.

Did you know?
  • Over 250 million tons of solid wastes are collected each year in Miami-Dade County alone.
  • U.S. residents produce an average of 5 pounds of trash each day.
  • 25% of the total waste in Miami Dade County contains food scraps or yard waste that could be composted.

Composting is just one way to lessen your carbon load on this earth. It is also great to be able to use the nutrient-rich soil in your garden. Composting reduces the use of synthetic fertilizer and provides natural, free, non toxic fertilizer. It helps plants grow in South Florida’s rocky soil by improving soil structure, moisture and nutrient retention. Composting diverts waste from landfills, which produce methane gas that contribute to climate change. It saves money and energy that would normally be spent on trash collection. Finally Composting provides an excellent way to recycle kitchen scraps and yard clippings.

I am hoping that this compost bin produces beautiful nutrient rich soil that I can add to my garden. I hope my worms finally thrive in this new environment and my gift in return will be a beautiful garden that provides a great environment to all the wildlife in my area.
Visit My Website:
CLICK HERE

Or Visit My Etsy Shop:
CLICK HERE