How I Got Started
I started Butterfly gardening many years ago. My yard has been a progression over the years, and has made many transformations. Twenty years ago I experienced Hurricane Andrew. My yard and house were destroyed. We decided not to replace the pool screening and open up the backyard and put in some landscaping. That was the official beginning of my love for gardening in South Florida. I added a beautiful water garden years ago, and have been adding host and larvae plants for pollinators, mostly for the butterfly, for as many years as I can remember. I had my yard certified as a Natural Habitat, through the National Wildlife Foundation. To have a natural habitat you need to provide and meet certain requirements: 1. Provide a food source, 2. Provide a water source, 3. Cover, 4. A place to raise young. I try not to use any pesticides in my yard. I vermicompost and recycle as many of my food scraps as possible. If I had more land I would have a huge compost bin to recycle all my yard cuttings. Basically, I try to lessen my carbon footprint on this earth. In my own little world or backyard I try to provide an ecosystem in my water garden, provide birdbaths, birdfeeders, hummingbird nectar sources, feeders, puddling areas, host plants and nectar plants for butterflies and other pollinators. I am hoping to raise everyone’s awareness of the importance of saving our Butterflies, Blooms & Bees. Without them our world and food source will be in trouble. I hope you all enjoy my journey. I am not a Master Gardener, or Master Beekeeper, an Entomologist, or Journalists. I am simply a Backyard Gardener who is trying to lessen her Carbon Footprint of this Earth.
I hope you enjoy my blogs.
Sunday, October 21, 2012
Happy One Year Anniversary!!!!
Can you believe that it has been one year since I started bee keeping? I know it is really hard to beelieve! For those of you that follow my blog you know it hasn’t exactly been a boring year. It has been exciting, and very eventful! Looking back I can definitely say I have learned a lot, and I certainly haven’t been bored. When I first started beekeeping I really had very little idea what I was doing. I just wanted to help the pollinators, reap the benefits of getting some honey, and thought it would be a really cool hobby. Little did I know that I would risk life and limb, so to speak, during this year to protect these very special pollinators?
Looking back over the year it has been pretty amazing and very rewarding. I started with 2 TBH and now have 5 hives. The first time I saw Sam Comfort at the Palm Beach County Beekeepers Association meeting he asked me how my bees were doing. I honestly couldn’t answer as I really didn’t know enough. Now I can answer quite honestly, “they are doing great!”
To recap the year in beekeeping my hives grew tremendously in the spring. I split the hives from 2 hives to 4 hives and then battled them over the next few months until they raised a queen. It felt like this would never happen, and of course the weather didn’t help at all. As you know we are almost ready to break a record for the most rainfall since 1959. After several months all my hives were queen right. I got to visit Albuquerque NM, and take a beekeeping class from Les Crowder. I learned a lot from that visit and thoroughly loved that part of the country. I rendered wax from my hives, have made honey Mead, and of course harvested many wonderful jars of honey.
For those of you that follow my blog you know that I experienced an anaphylactic reaction after sustaining several stings in June. That was really scary and I hope it never happens again. I am still visiting the allergist for immunotherapy, which will continue for several years. From my blog pictures I have had several run ins with the bees, and sometimes think I am practicing “Combat Gardening”, but I have survived. My bees have stung my yard and pool guys; thank God no law suits yet. Right now the hives are “bee having” and the Brazilian pepper is in bloom. That means the honey flow is on.
I have learned so much during this first year. Here’s to an exciting 2nd year!! Happy Anniversary to me and my hives! Most people would have given up, but I am determined!
Sunday, October 14, 2012
Building a Compost Bin
First of all what is vermicomposting?? The simple answer is composting with worms. A more technical definition is: Vermicompost is the product or process of composting using various worms, usually red wigglers, white worms, and other earthworms to create a heterogeneous mixture of decomposing vegetable or food waste, bedding materials, and vermicast. Vermicast, also called worm castings, worm humus or worm manure, is the end-product of the breakdown of organic matter by an earthworm. These castings have been shown to contain reduced levels of contaminants and a higher saturation of nutrients than do organic materials before vermicomposting. Containing water-soluble nutrients, vermicompost is an excellent, nutrient-rich organic fertilizer and soil conditioner. This process of producing vermicompost is called vermicomposting.
I started vermicomposting many years ago; like I said I have not really been that successful mostly because of the heat in Miami. I started with a simple container called “Can O Worms”. It is a simple system where you stack circular bins on top of each other. First you add your food scraps from the kitchen into the first layer, until the worms break them down into compost. Then you add the next layer, the worms are suppose to crawl up through the holes, they start processing the next layer, so on and so forth. The issue with “Can O Worms” is that the circular bins do not have enough surface area for the worms to bury. The container is too narrow and the organic matter heats up too quickly and the worms cannot stay cool enough. The earth worms that you use to vermicompost are usually red wigglers Eisenia foetid. Redworms prefer temperatures between 55 and 77 degrees Fahrenheit and are suited to living in a worm bin, but not here in South Florida. The temperature of the bedding should not be allowed to get below freezing or above 84 degrees. There are so many days in Miami that are above 84 degrees, which is exactly the problem.
Why use worms? Well, for one, because they're cool. Not only are they slimy and neat-looking, these amazing little organisms can eat up to half their body weight in food every day. Using worms instead of a compost pile ensures faster composting and a rich, dark fertilizer. Besides -- what's more fun than getting to say, "Worms eat my garbage?" In fact there is an excellent book titled “Worms eat my Garbage” by Mary Appelhof. This is an excellent resource to learn all about vermicomposting. Red wigglers are surface feeders so the container cannot be too deep, although in Miami it needs to be deep enough that the worms have enough area to ensure that the organic matter stays cool enough.
A year or so ago my husband and I built a “Flow Through” compost bin out of a garbage can. It worked well for awhile but again because it was made from recycled black plastic it retains the heat and the worms would get too hot and eventually they died. Here are a few pictures from us building that compost bin. This one actually worked better than the Can o Worms. We put air vents in the lid to keep the unit cooler. We lined the bottom with newspaper and cardboard that eventually would decompose, and the worm casting and compost would flow through the PVC piping into the bottom of the compost bin to use in my garden. We even screened the bottom so no critters could get into the unit. I tried to place the unit where it only got a little morning sun but ambient temperature was just too hot and eventually my worms would die.
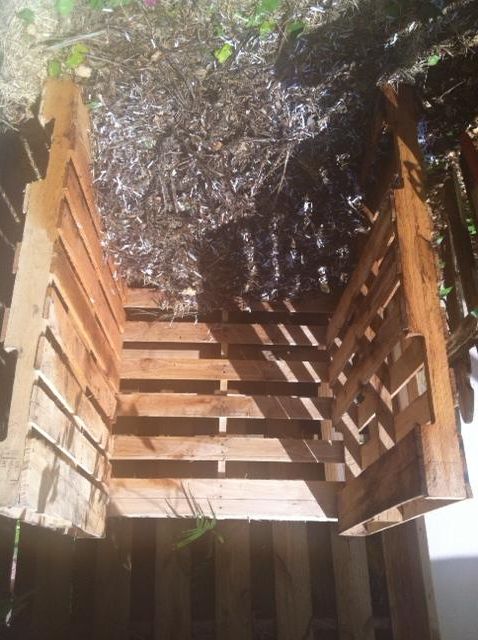
I haven’t done any composting in several months and it feels good to be collecting my food scraps and yard debris to add to my compost pile. I built a simple compost bin out of 3 used wooden pallets. It was very easy to put together using deck screws to hold the unit in place. I didn’t add a door and am leaving the unit open and hoping that I do not get too many critters helping themselves to the rich compost material. My philosophy in my yard is to be as responsible as possible by incorporating as much sustainable gardening as possible. I am trying to lessen my carbon footprint on this earth. Composting is just one more way to do this. Vermicomposting like I said is just composting with worms. I am not sure if my worms will live, but I am hoping that this new bin might be the answer to my vermicomposting troubles. It is kind of like digging a hole in the ground and adding worms. It just contains them a little better.
What do I add to my compost bin?? All organic matter is made up of Carbon and Nitrogen. The balance of these two elements in an organism is called the carbon-to-nitrogen ratio (C: N ratio). For best performance, the compost pile, require the correct proportion of carbon for energy and nitrogen for protein production. Scientists have determined that the fastest way to produce fertile, sweet smelling compost is to maintain the C: N ratio somewhere around 25 to 30 parts carbon to 1 part nitrogen. You can think about Carbon as Brown material like wood chips, dried leaves, newspaper and paper towels, and plant and grass clippings. Nitrogen or Green material examples are food scraps from your kitchen, tea bags, coffee grounds, nuts, and seeds. You should avoid placing meat, fish, dairy, or oils in the compost bin. Your compost bin should be moist, but not wet. The more you aerate your compost bin the quicker the organic material will break down.
Did you know?
- Over 250 million tons of solid wastes are collected each year in Miami-Dade County alone.
- U.S. residents produce an average of 5 pounds of trash each day.
- 25% of the total waste in Miami Dade County contains food scraps or yard waste that could be composted.
Composting is just one way to lessen your carbon load on this earth. It is also great to be able to use the nutrient-rich soil in your garden. Composting reduces the use of synthetic fertilizer and provides natural, free, non toxic fertilizer. It helps plants grow in South Florida’s rocky soil by improving soil structure, moisture and nutrient retention. Composting diverts waste from landfills, which produce methane gas that contribute to climate change. It saves money and energy that would normally be spent on trash collection. Finally Composting provides an excellent way to recycle kitchen scraps and yard clippings.
I am hoping that this compost bin produces beautiful nutrient rich soil that I can add to my garden. I hope my worms finally thrive in this new environment and my gift in return will be a beautiful garden that provides a great environment to all the wildlife in my area.
Saturday, October 13, 2012
Honey Flow is on in Florida!
Distribution of Brazilian pepper tree throughout Florida is widespread, although limited to the warmer areas due to sensitivity to cold temperatures. Brazilian pepper can be found as far north as Levy and St. Johns Counties, and as far west as Santa Rosa County. It is an aggressive invader of disturbed habitats; this characteristic has led to its placement on the Florida Exotic Pest Plant Council’s list of invasive species. Many plant communities such as hammocks, pinelands and mangrove forests are often invaded and dominated by Brazilian pepper trees. The family Anacardiaceae contains poison ivy, poison oak, poison sumac, and Schinus terebinthifolius, or Brazilian pepper-tree. People sensitive to poison ivy, oak or sumac may also be allergic to the Brazilian pepper tree because it also has the potential to cause dermatitis to those with sensitive skin. Some people have also expressed respiratory problems associated with the bloom period of pepper tree. Brazilian pepper-tree is a shrub or small tree that reaches over 30 feet in height, typically with a short trunk hidden in a thicket of branches. Some trees can live over 30 years. The leaves are alternately arranged with 1-2 inch long, elliptic, and finely toothed leaflets. The leaves are also reddish, often possessing a reddish mid-rib. The flower clusters are white and 2-3 inches long with male and female flowers that look very similar. The glossy fruits are borne in clusters that are initially green, becoming bright red when ripe. Seeds are dark brown and 0.3 mm in diameter. Flowering occurs from September through November and fruits are usually mature by December. This shrub/tree is one of the most aggressive and wide-spread of the invasive non-indigenous exotic pest plants in the State of Florida. There are over 700,000 acres in Florida infested with Brazilian pepper tree. Brazilian pepper tree produces a dense canopy that shades out all other plants and provides a very poor habitat for native species. This species invades aquatic as well as terrestrial habitats, greatly reducing the quality of native biotic communities in the state. Birds and mammals are the primary mechanisms for dispersal, although seeds may be transported via flowing water. Seeds are viable for up to 2 months, losing viability as time progresses. Germination is improved by scarification. Typically, acids in an animal’s digestive tract provide adequate scarification required for germination. The invasiveness of Brazilian pepper tree in Florida can be attributed to its high germination rates and dispersal agents.
I had no idea the Brazilian pepper tree was related to the poison ivy, poison oak, poison sumac. When I was young girl I was highly allergic to all poisons. I talked about all my fond memories as a child playing in the fields and climbing vines in the mountains. It got to the point that if the wind blew I got poison oak, ivy or sumac. I am not sure that this was a fond memory but I do remember being one big pustule. My parents considered getting me desensitized but were advised against it. I must have outgrown this allergy. I should be careful now that I know that the Brazilian pepper is related to the poison ivy, oak and sumac, although I don’t have any desire to go rub up against it. I have enough difficulty being allergic to my bees.
Before I started bee keeping I had no idea what a Brazilian pepper tree was. Now I actually look forward to its blooms and invasiveness. It is almost a year since I started beekeeping. I got my hives October 21, last year. That is when I first learned of the Brazilian pepper tree and how important it is as a nectar source for our bees. I quickly investigated what this tree was all about and discovered that it is really not a tree you want in your yard because of its invasiveness, but if you are a beekeeper you sure are glad if you have any within the bees foraging radius. I actually went in search of this tree. I discovered that my neighborhood is completely covered with this tree around the perimeter. I am really glad that my bees get to enjoy the pollen and nectar provided by this tree. Right now I can see the little white buds of the flower cluster starting to open.
I went into the hive the other day and discovered a large amount of pollen and nectar in the cells. All the hives had a very distinctive color about them, almost golden. My mentor Inese told me that this is the color of the nectar and pollen from the Brazilian pepper. The nectar that is in the cells has an almost iridescent color to it. I remember last year at Christmas when I harvested my first honey it was from the Brazilian pepper tree, it was very dark and delicious tasting. I look forward to harvesting this honey again this year. I took a picture of the honeycomb so that you could see the color; inside the hive box the wood also had this distinct color. The bees are busy capping some very nice honey; I look forward to harvesting this honey in the months ahead.
Wednesday, October 10, 2012
Homebrewing Pumpkin Ale
Here is the recipe:
Pumpkin King Autumn Ale
- 6oz. Aromatic
- 4oz. Biscuit
- 4 oz. Cara Red
- 2 oz. Chocolate
- 1 lb. Maris Otter
- ½ oz. Allspice
- ¼ oz Nutmeg
- ¼ oz. Cinnamon
- ¼ oz. Fresh Ginger
- ¼ oz. Cloves
- 3 lbs Munich Extract
- 3 lbs Pilsner Extract
- 1 lb Turbinado Sugar
- 1 oz. Cluster @ 45
- 1 oz. Willamette@30
- 1 oz. Mt. Hood @ 15
- British Ale Yeast
- 30 oz. Cooked Pumpkin @ 1 week
Several weeks later we bottled our first ever beer. Not exactly in time for Halloween but it should be ready for early November. Part of the process in making beer is the carbonation that occurs in the bottles. To achieve the proper carbonation you need to add 5oz of priming sugar to the carboy before bottling. The sugars wake up the yeast and a secondary fermentation occurs. Since the CO2 has no place to escape it stays in the bottles and carbonation occurs. Bottling was super easy and really fun. The siphoning tool actually makes it really easy to add just the right amount of beer to each bottle. Capping was super easy also. We now have two cases of delicious Pumpkin Ale. The hardest part to making any of the wine or beer is the wait until it is complete. The beer needs to stay in a cool dark place for 5 weeks. We placed it in the main bathroom in the tub. There aren’t too many cool dark places in Miami, Florida.
I think the saying goes something like “Anything good is worth waiting for!” I can’t wait for the pumpkin ale to be ready to drink!
Monday, October 8, 2012
Preparing My Vegetable Garden
So far I have cleared the Cat Palms that were on the west side of the property. As I stated in my last blog the wall to the house is exposed and really isn’t very attractive. I have plans to plant some Sunflowers to hide the wall and make it look a little prettier to the eye. It is also a good idea to plant some flowers in the vegetable garden as they will invite pollinators to visit. Right now things are at a standstill because I called 811 to find out what lines run under the ground in that area. I know there are several lines on that side of the house and the gas meter is on the wall. They have 48 hours to respond and mark the lines. I tried to dig down into the dirt in that area, but it is very difficult. The houses in my neighborhood were built on Coral Rock. The dirt is very difficult to work. Over the years I have worked many of my flower beds and added compost and organic material to enhance the soil. I have bought earthworms in years past and compost in hopes of improving the soil nutrients. Some of my flower beds aren’t too bad because of all the working through the years, but this area on the Westside of the house has been ignored. The Cat Palms have been there for many years and they were root bound. There are still many roots and a lot of coral rock in this area. If I find out there are gas line etc in this area, it might be easier to put in a Raised Bed garden. A raised bed garden is actually recommended in Florida, because the soil is so poor, and there are many pests (nematodes) in the soil. It may be a better idea to get some really good soil and raise the area up by about 2 feet. I took several classes earlier in the year around permaculture and preparing the soil for a vegetable garden.
Many months ago I ordered some seeds from Baker Creek Heirloom Seed Company. I wanted nothing to do with GMO crops or seeds in my garden. Many famous companies sell hybrid seeds but I wanted pure seeds passed down through generations in my garden. I had read about BBB Seeds in several gardening blogs that I follow and felt comfortable with selecting my vegetables from them. I started planting some seeds that I don’t want to directly sow into the ground, so that in a few weeks after I have enhanced the soil and the weather becomes a little cooler I will be able to plant the vegetables directly into the ground. So far I have planted some tomatoes and orange peppers. Ideally you shouldn’t plant tomatoes in south Florida until it gets a little cooler. Waiting just a little bit will increase the amount of fruit the plant produces. I bought several different packages of seeds from Baker Creek; several varieties of tomatoes, one called Floradade, which is right from Dade County Florida, and a beefsteak variety. I also purchased something called Riesentraube Red tomato, along with some kale, spinach, beets, lettuce mix, atomic carrots, cucumber, zucchini squash, rainbow Swiss chard, radishes, okra, tomatillos, snap peas, and eggplant. That sounds like a bunch of stuff! I need to plot out where I want to place everything in the garden. The area that I am going to be planting is approximately 25’x 4’ wide. I also need to watch the sun patterns so I can plant those plants that need the most sun in the sunniest spots, and most importantly I need to work on my soil. Hopefully I will be planting in about 2 weeks. I bought some seed pods by Jiffy to start my tomatoes, and some of my sunflowers at Home Depot. They are super easy to use and the plants are already sprouting. Here are some pictures.
CLICK HERE
Or Visit My Etsy Shop:
CLICK HERE
